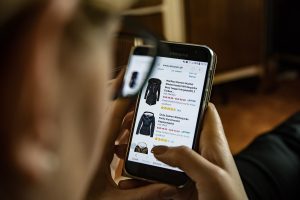
One of the crucial steps for creating a huge brand on Amazon is having the perfect listing, and images are key for this. That’s why, in this post, we will teach you all the Amazon product images’ best practices
What is Amazon Product Photography?
Amazon product photography is the art of taking pictures in a way that communicates to potential customers why they should buy your product.
This type of photography differs from regular product photos because it is more focused on the features and benefits of the product while maintaining an attractive appeal.
Amazon Images: The importance of highlighting your product
When we enter the world of online sales, visual content represents the primary instance of interest: the first approach, the first interpretation, and most importantly, the first step in creating a sales opportunity.
By providing high-quality content, customers will be able to easily evaluate the product.
Remember:
quality of the listing = quality of the product.
The main objective will be to convince your potential buyers, with a brief (and extraordinary) visual sample.
Every Amazon detail page requires at least one product image. Amazon lets you upload up to 7 images (including the Hero image), as well as videos.
Types of images on Amazon
In this way, there are 2 basic types of images that every plan should have:
- Hero images, and
- Secondary images, which include infographics and lifestyle images.


a) Hero image: the photo that represents a product in the search results and browses pages, and is the primary picture clients see on a product detail page.
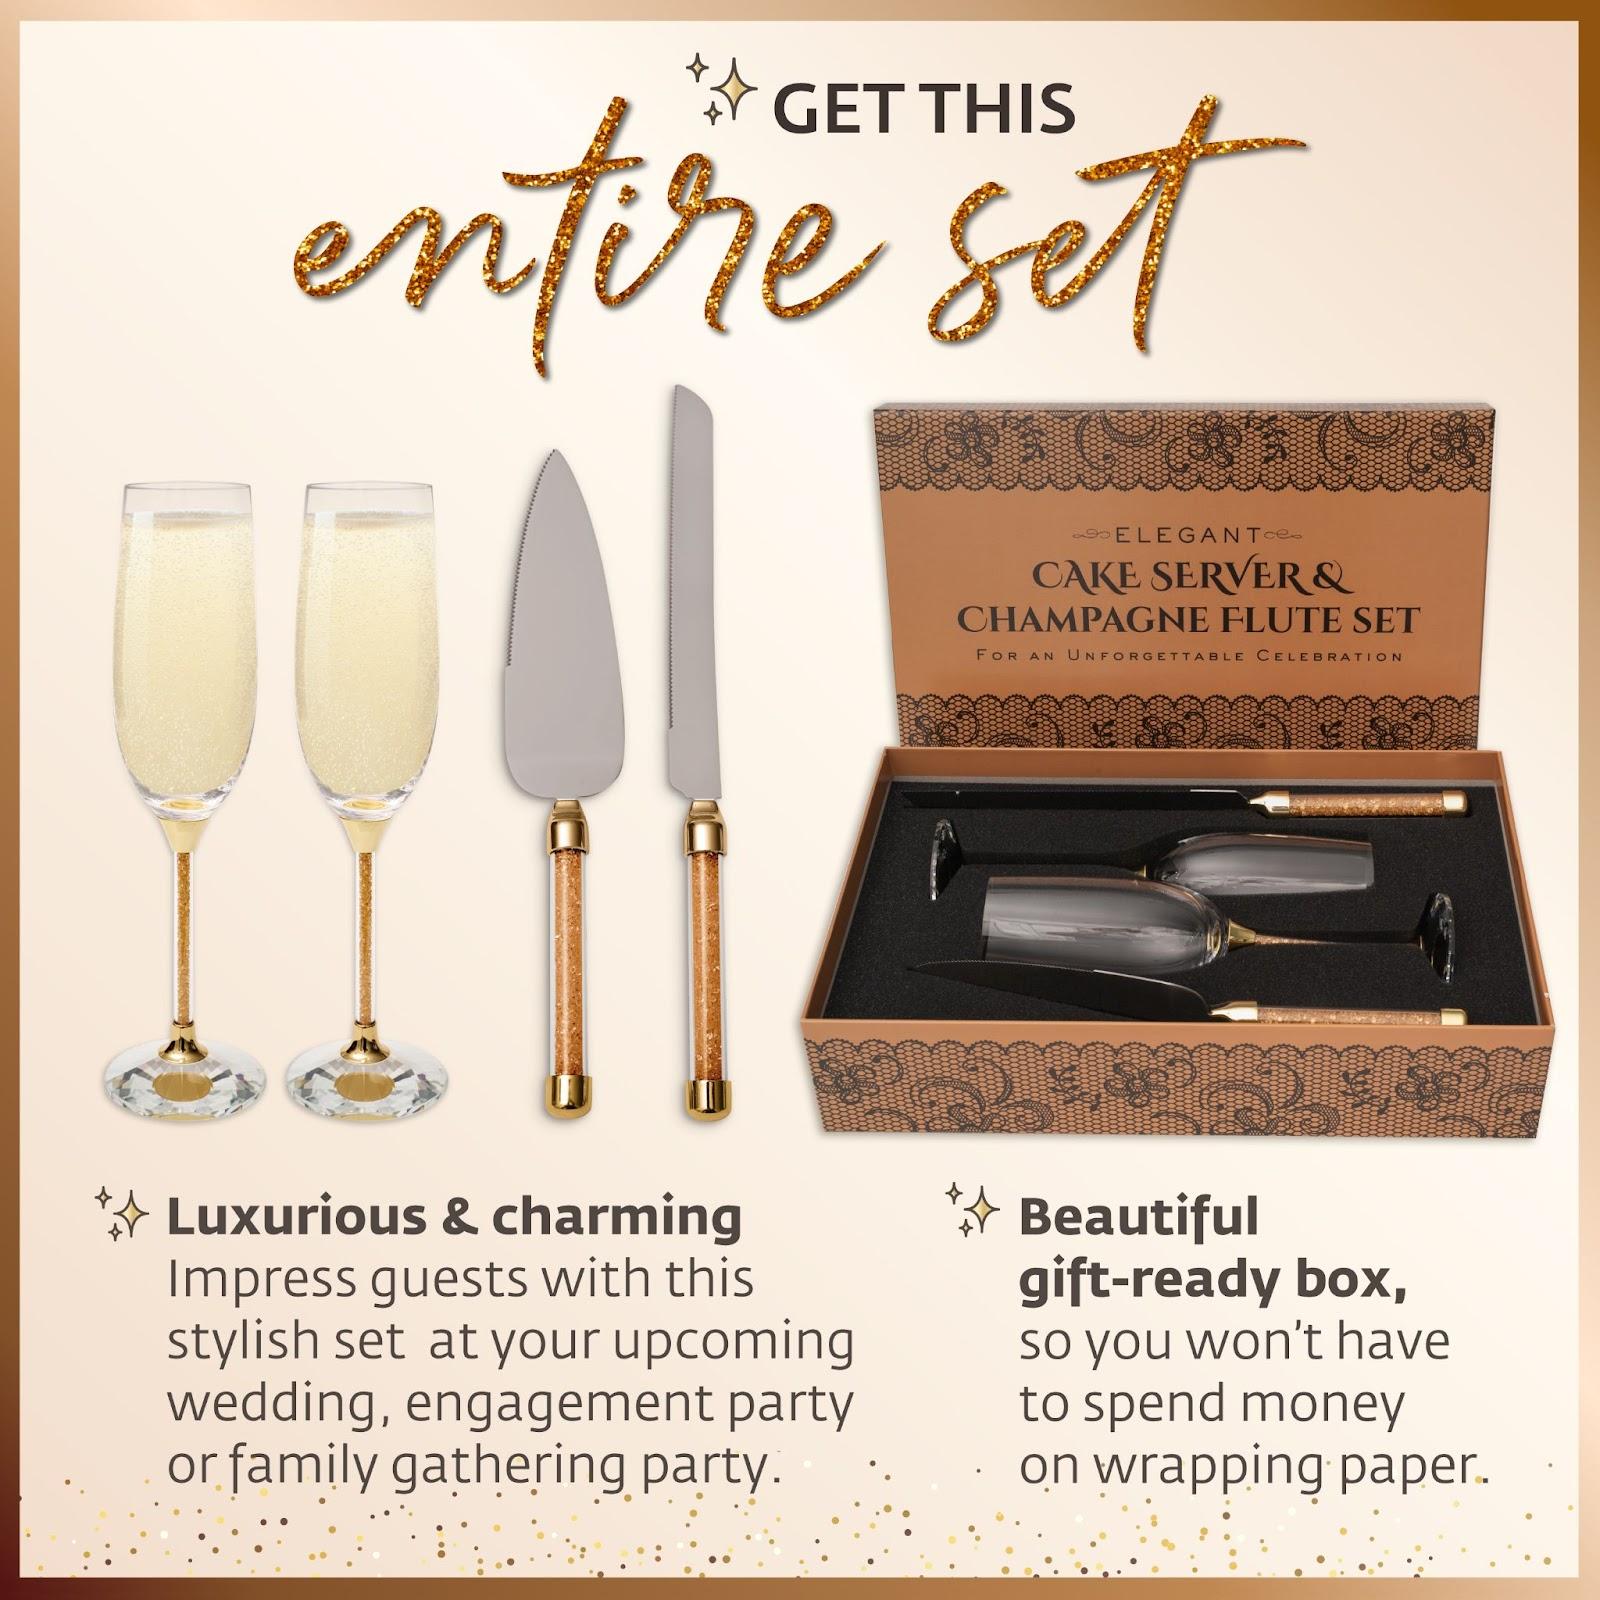
b) Infographics: a visual representation of information or data, presented through graphics that make it easy for Amazon shoppers to quickly and clearly digest information.
c) Lifestyle image: designed to show your product in action. Since the potential buyers can’t have the product in front of them, these pictures help them envision what using the product would be like.
According to Content Marketing Statistics for 2022, people following directions with text and illustrations do 323% better than people following directions without illustrations. We must definitely take advantage of that!
Amazon product image requirements:
-
-
-
Add a short description (4 words max)
-
Add a short description (4 words max)
Such as adding lifestyle images to your infographic is legit, and so is adding info to your lifestyle image.
Adding a small phrase can help better transmit the message you want to convey with your lifestyle image.
If you apply all of these tips, you’ll be sure to boost your brand awareness, which means more sales in the long term!
However, if you’re still not convinced, book a marketing consultation with us! It’s free, and we’ll help you skyrocket your sales and give you the best listing for your great product.
But your product should always be the protagonist of your image. SoÂ
Always try to appeal to your customer’s pain points (the negative things that they are looking to solve with your product)
-
-
Add a short description (4 words max)
-
Such as adding lifestyle images to your infographic is legit, and so is adding info to your lifestyle image.
Adding a small phrase can help better transmit the message you want to convey with your lifestyle image.
If you apply all of these tips, you’ll be sure to boost your brand awareness, which means more sales in the long term!
However, if you’re still not convinced, book a marketing consultation with us! It’s free, and we’ll help you skyrocket your sales and give you the best listing for your great product.
-
-
Interaction with the product.
-
It should always be the model interacting with the product. Avoid the product being in one place and the model being in another one unless it is strictly necessary to make your product more understandable.

As you can see in this example, the model not only is interacting with the product but also is looking at it.
Sometimes sellers make the mistake of showing the model looking at the camera. It distracts the customer from the product and puts attention on the model.
But your product should always be the protagonist of your image. SoÂ
Always try to appeal to your customer’s pain points (the negative things that they are looking to solve with your product)
-
-
Add a short description (4 words max)
-
Such as adding lifestyle images to your infographic is legit, and so is adding info to your lifestyle image.
Adding a small phrase can help better transmit the message you want to convey with your lifestyle image.
If you apply all of these tips, you’ll be sure to boost your brand awareness, which means more sales in the long term!
However, if you’re still not convinced, book a marketing consultation with us! It’s free, and we’ll help you skyrocket your sales and give you the best listing for your great product.
-
-
The right text size
-
The text should have a perfect size so that it can be perfectly readable. Don’t make it too big so that it takes more space than necessary, but also don’t make it too short so that people have to zoom out to read what your image says
For lifestyle images
-
-
Interaction with the product.
-
It should always be the model interacting with the product. Avoid the product being in one place and the model being in another one unless it is strictly necessary to make your product more understandable.

As you can see in this example, the model not only is interacting with the product but also is looking at it.
Sometimes sellers make the mistake of showing the model looking at the camera. It distracts the customer from the product and puts attention on the model.
But your product should always be the protagonist of your image. SoÂ
Always try to appeal to your customer’s pain points (the negative things that they are looking to solve with your product)
-
-
Add a short description (4 words max)
-
Such as adding lifestyle images to your infographic is legit, and so is adding info to your lifestyle image.
Adding a small phrase can help better transmit the message you want to convey with your lifestyle image.
If you apply all of these tips, you’ll be sure to boost your brand awareness, which means more sales in the long term!
However, if you’re still not convinced, book a marketing consultation with us! It’s free, and we’ll help you skyrocket your sales and give you the best listing for your great product.
-
-
Combine with lifestyle images
-
Lifestyle images help the customer better understand how the product works in real life. If you can show its features both with text and a real-life image, it is going to significantly increase its comprehensiveness, and thus, your conversion rates.
Of course, it will only work if your lifestyle image is related to the text.
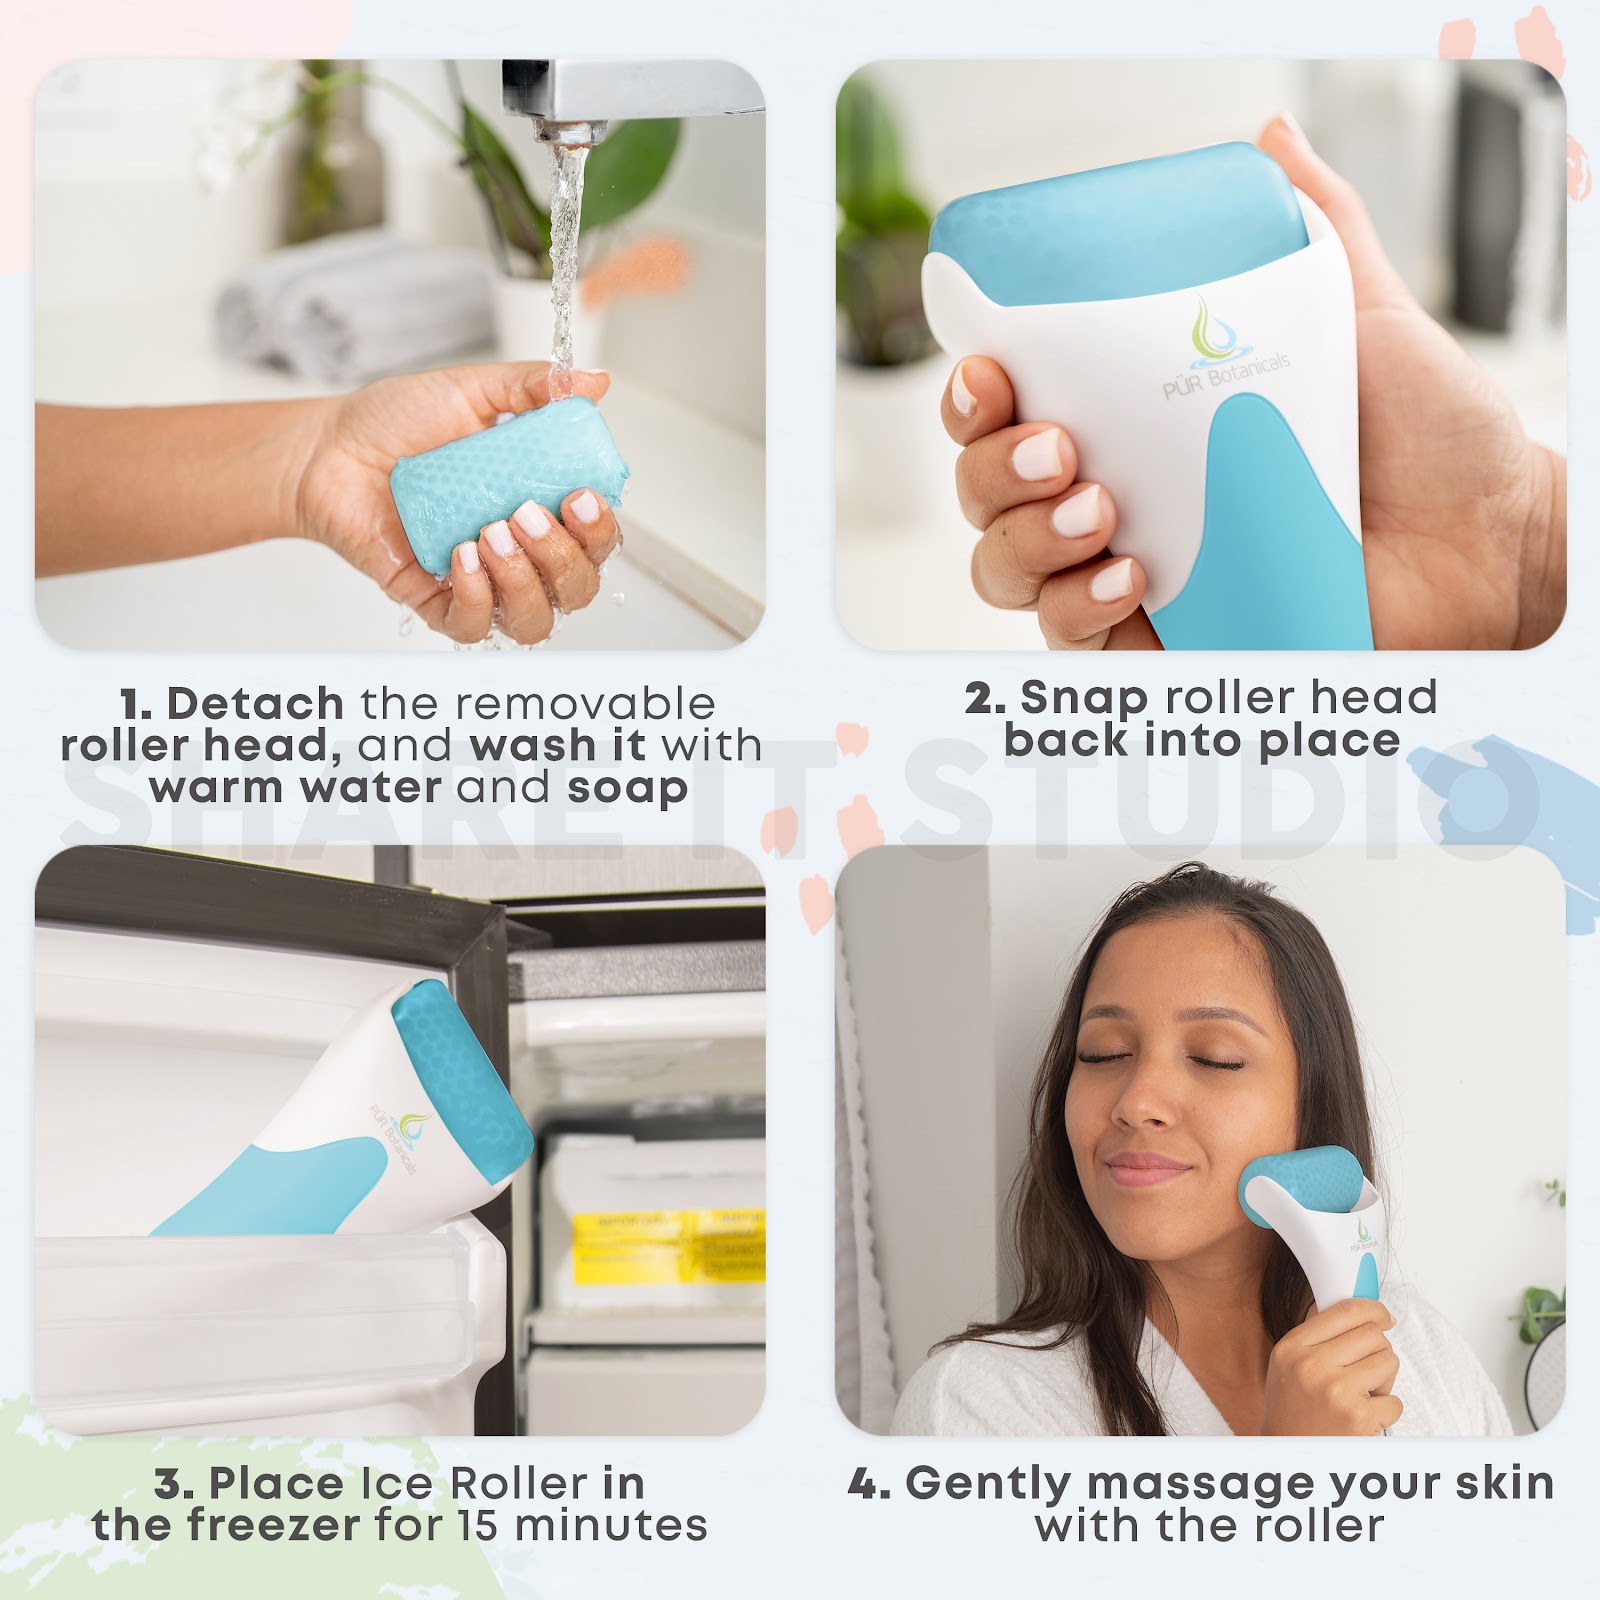
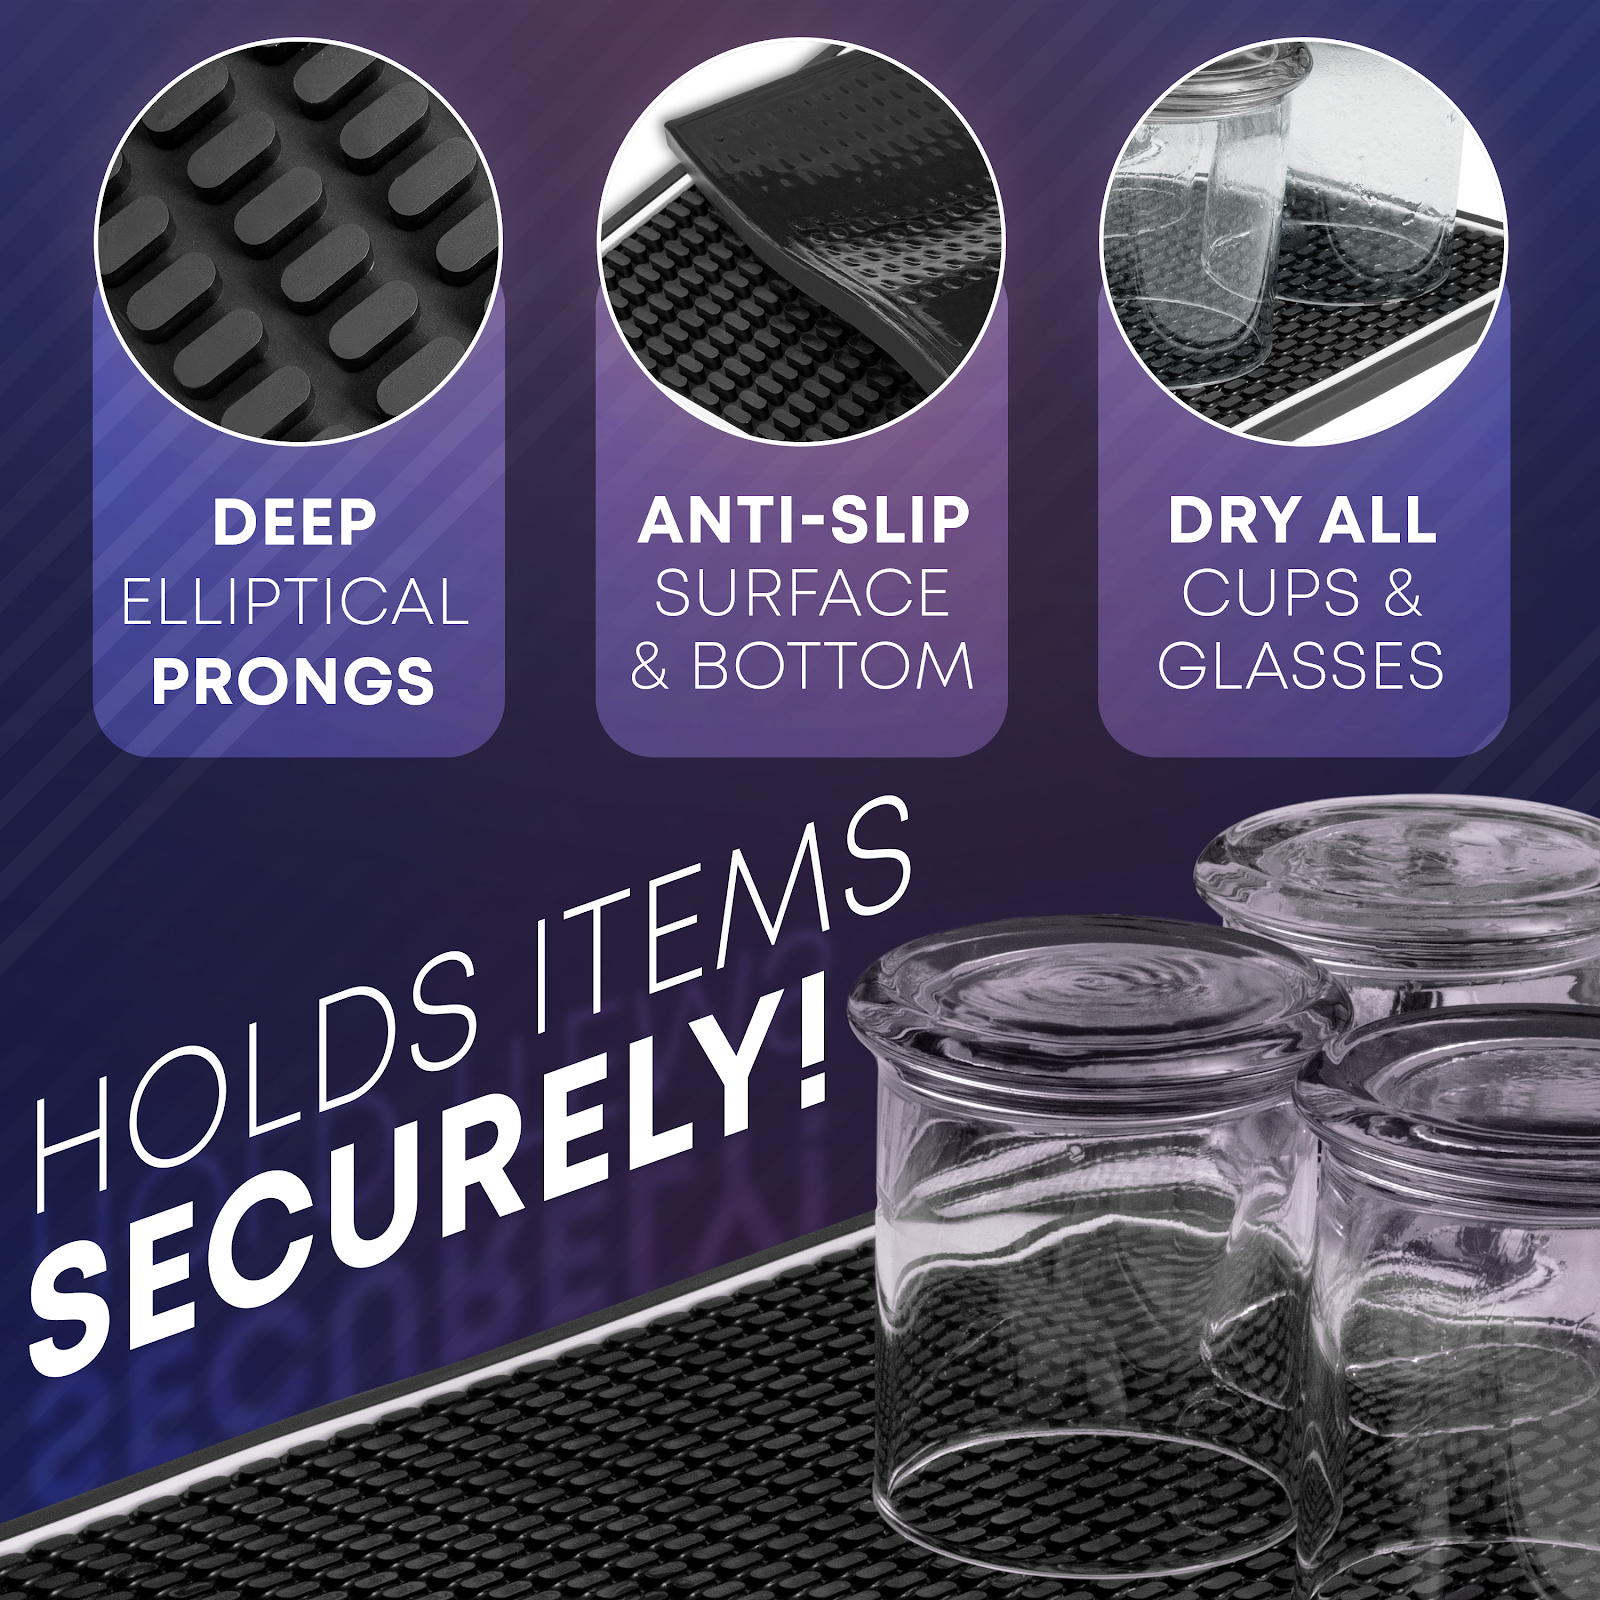
As you can see in this example, for each benefit, we illustrated a lifestyle image. But you can use one bigger as a background image, as you can see in the following infographic:
-
-
The right text size
-
The text should have a perfect size so that it can be perfectly readable. Don’t make it too big so that it takes more space than necessary, but also don’t make it too short so that people have to zoom out to read what your image says

For lifestyle images
-
-
Interaction with the product.
-
It should always be the model interacting with the product. Avoid the product being in one place and the model being in another one unless it is strictly necessary to make your product more understandable.

As you can see in this example, the model not only is interacting with the product but also is looking at it.
Sometimes sellers make the mistake of showing the model looking at the camera. It distracts the customer from the product and puts attention on the model.
But your product should always be the protagonist of your image. SoÂ
Always try to appeal to your customer’s pain points (the negative things that they are looking to solve with your product)
-
-
Add a short description (4 words max)
-
Such as adding lifestyle images to your infographic is legit, and so is adding info to your lifestyle image.
Adding a small phrase can help better transmit the message you want to convey with your lifestyle image.
If you apply all of these tips, you’ll be sure to boost your brand awareness, which means more sales in the long term!
However, if you’re still not convinced, book a marketing consultation with us! It’s free, and we’ll help you skyrocket your sales and give you the best listing for your great product.
-
-
No more than 4 features.
-
Infographics are supposed to give the client reassurance that the product is going to work, so an infographic shouldn’t have more than 4 features, but it has to be complete enough to make the client certain about the usefulness of the product
So be clear and concise, and select only the information that is really important to your customer.Â

-
-
Combine with lifestyle images
-
Lifestyle images help the customer better understand how the product works in real life. If you can show its features both with text and a real-life image, it is going to significantly increase its comprehensiveness, and thus, your conversion rates.
Of course, it will only work if your lifestyle image is related to the text.

As you can see in this example, for each benefit, we illustrated a lifestyle image. But you can use one bigger as a background image, as you can see in the following infographic:

-
-
The right text size
-
The text should have a perfect size so that it can be perfectly readable. Don’t make it too big so that it takes more space than necessary, but also don’t make it too short so that people have to zoom out to read what your image says

For lifestyle images
-
-
Interaction with the product.
-
It should always be the model interacting with the product. Avoid the product being in one place and the model being in another one unless it is strictly necessary to make your product more understandable.

As you can see in this example, the model not only is interacting with the product but also is looking at it.
Sometimes sellers make the mistake of showing the model looking at the camera. It distracts the customer from the product and puts attention on the model.
But your product should always be the protagonist of your image. SoÂ
Always try to appeal to your customer’s pain points (the negative things that they are looking to solve with your product)
-
-
Add a short description (4 words max)
-
Such as adding lifestyle images to your infographic is legit, and so is adding info to your lifestyle image.
Adding a small phrase can help better transmit the message you want to convey with your lifestyle image.
If you apply all of these tips, you’ll be sure to boost your brand awareness, which means more sales in the long term!
However, if you’re still not convinced, book a marketing consultation with us! It’s free, and we’ll help you skyrocket your sales and give you the best listing for your great product.
-
-
Consider using hand models or props
-
If your product is something that you can touch or interact with, you should consider using a hand model.
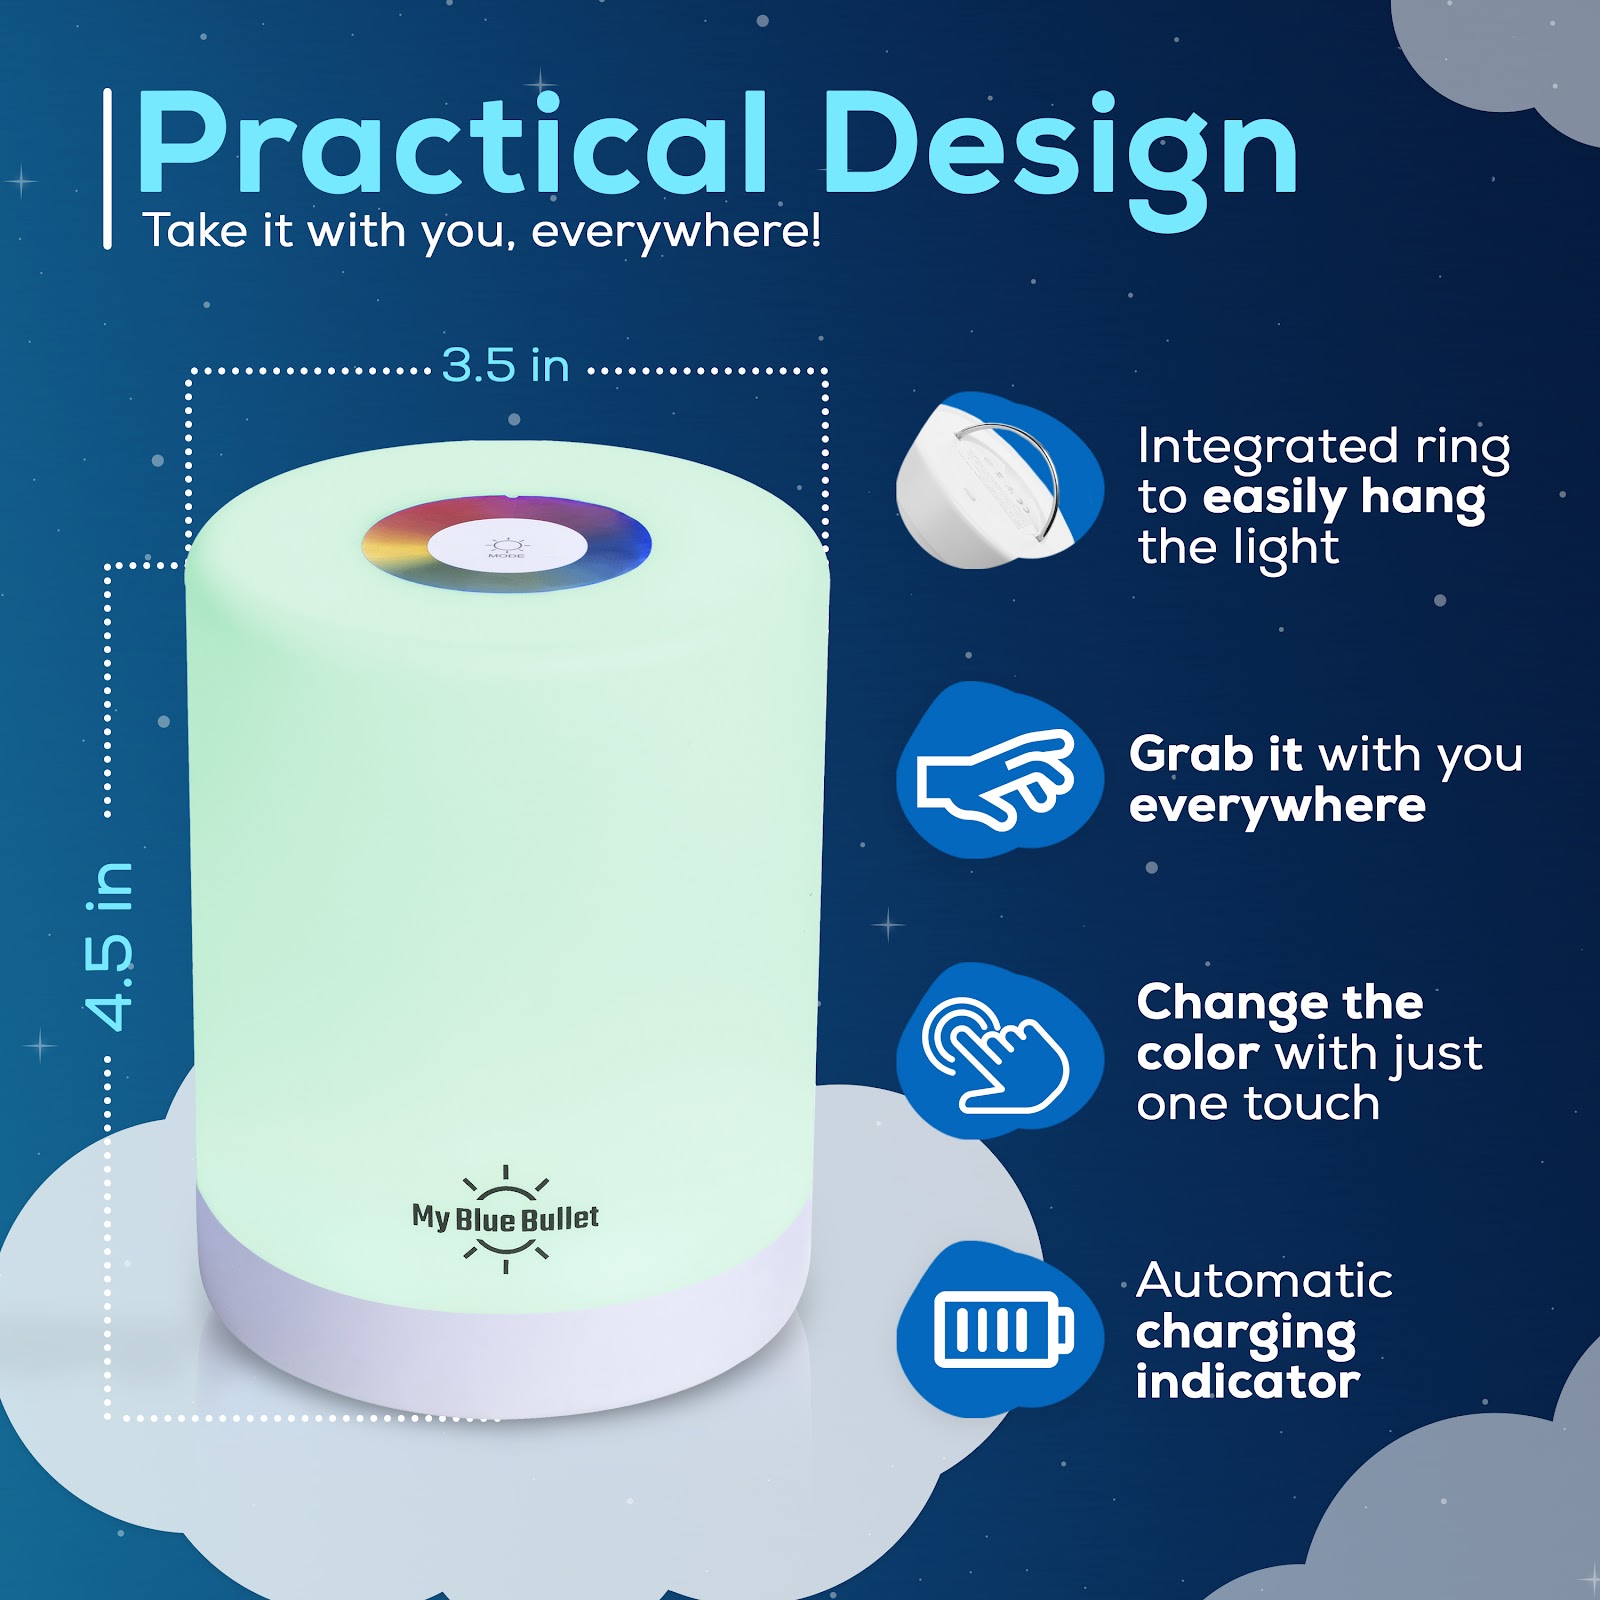
We optimized a hero image for one of our clients’ touch light products, which clearly relies on the touching experience:

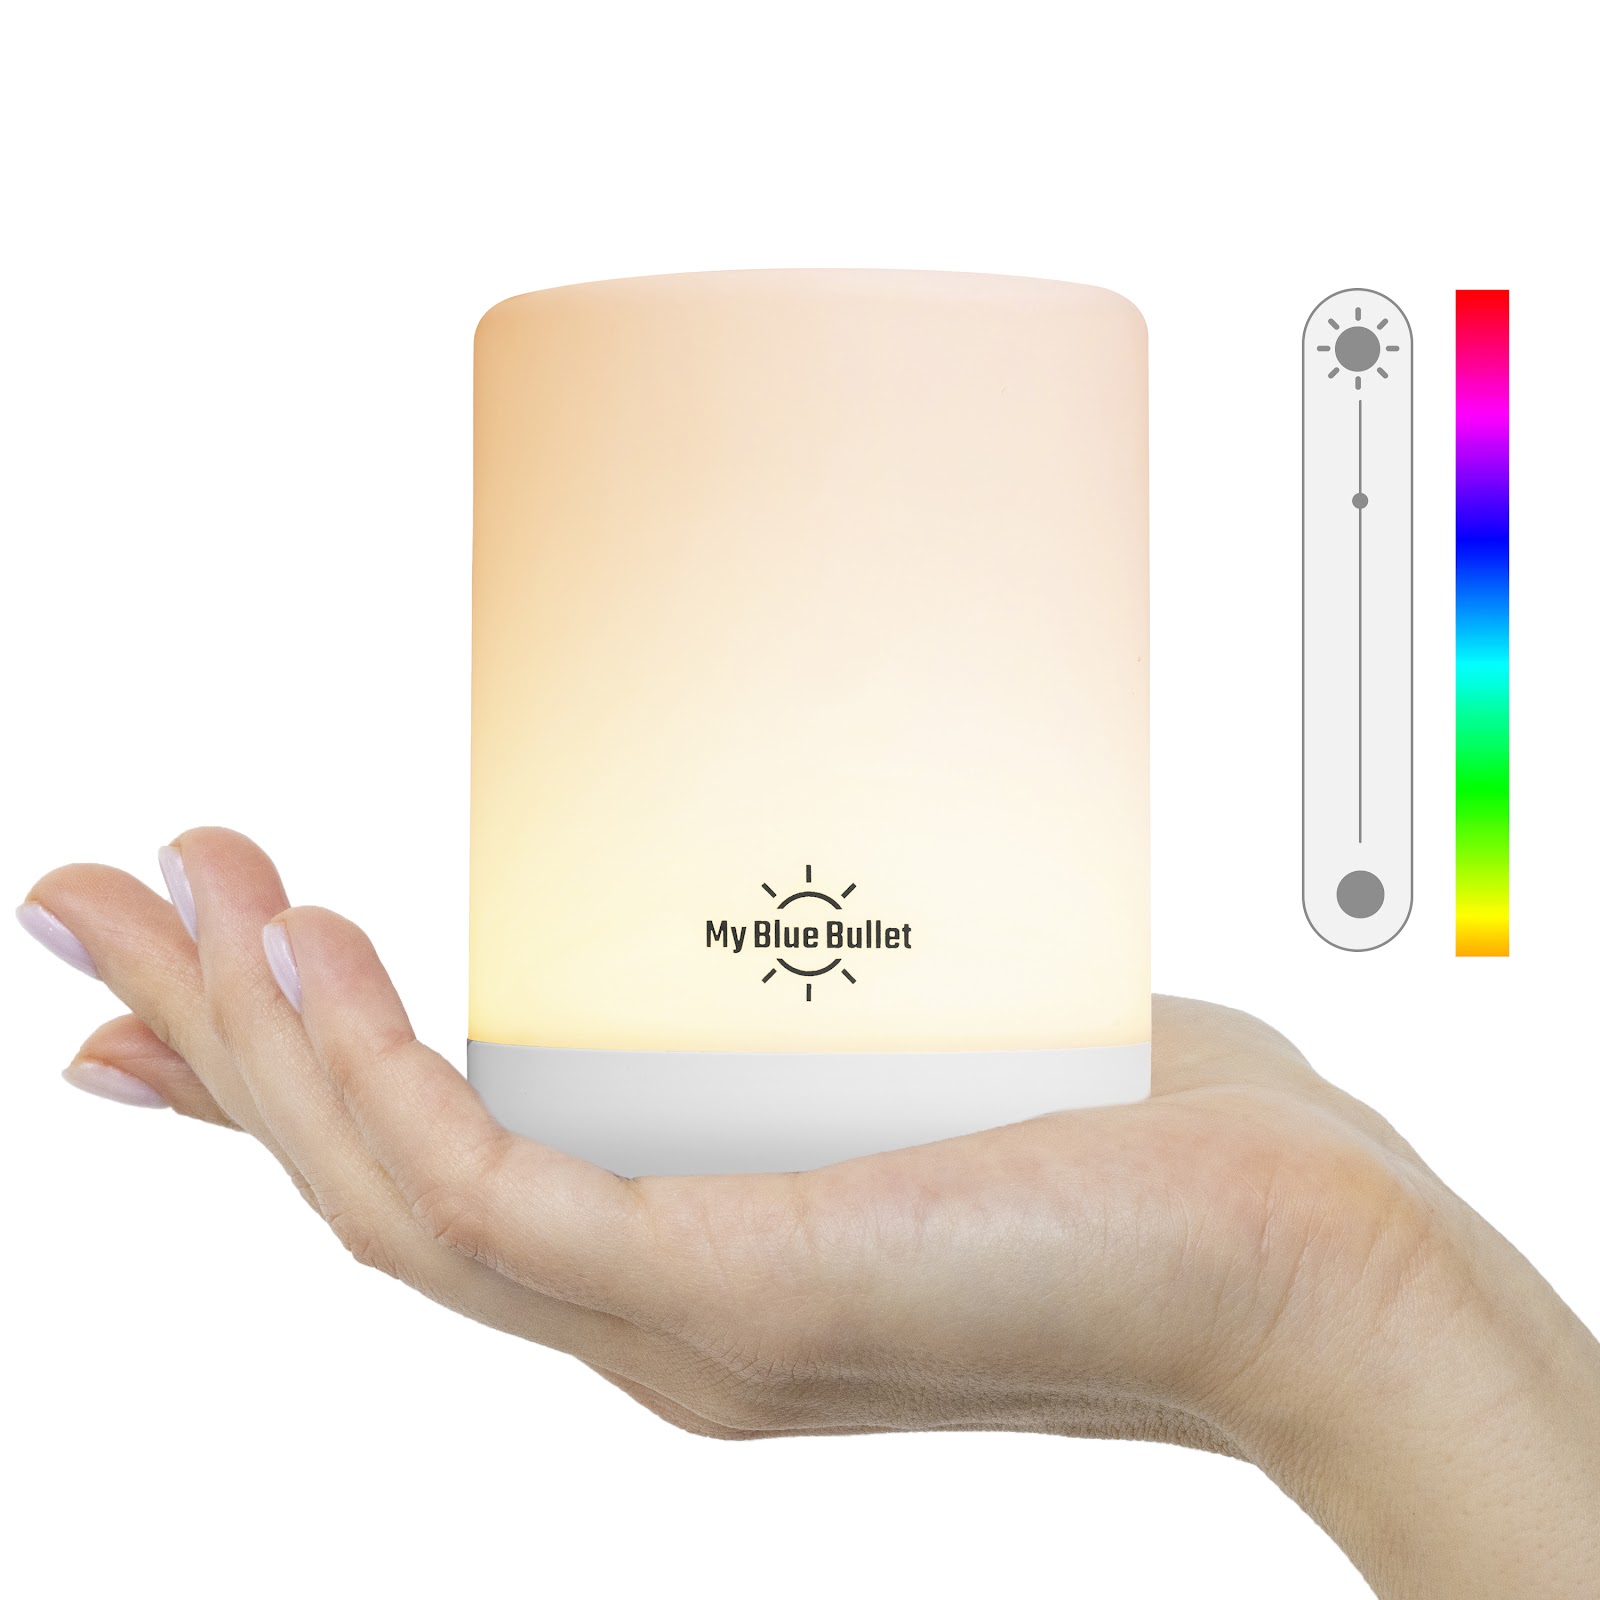
As you can see, we included a female hand model to connect with the buyer persona, who by the way were women who wanted to enhance their babies’ sleep.
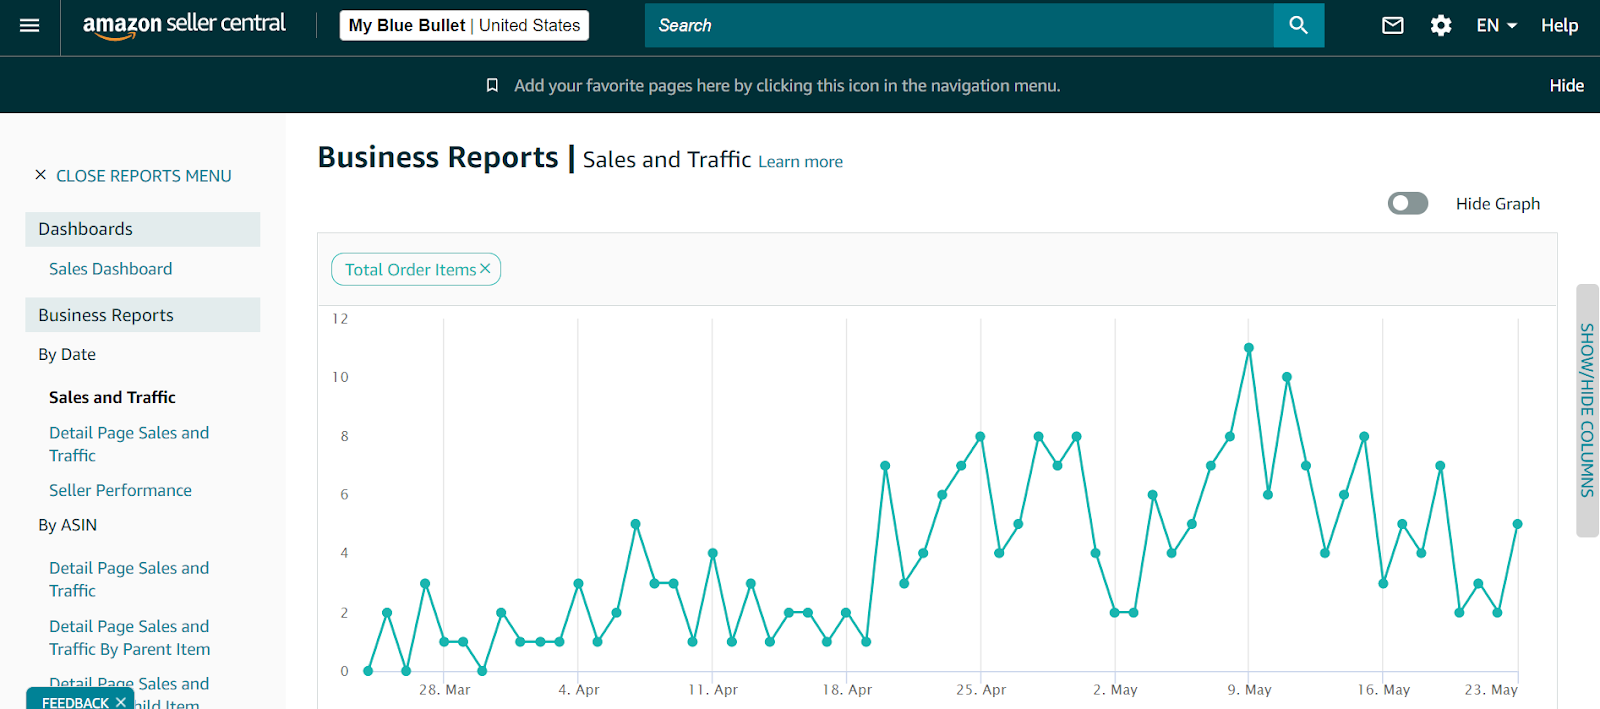
After uploading the content on April 16, our client increased sales by 85.7% without tweaking PPC or driving external traffic
So always keep in mind your customer persona and use props when they are going to help you enhance the comprehension of your product.
For infographics
-
-
No more than 4 features.
-
Infographics are supposed to give the client reassurance that the product is going to work, so an infographic shouldn’t have more than 4 features, but it has to be complete enough to make the client certain about the usefulness of the product
So be clear and concise, and select only the information that is really important to your customer.Â

-
-
Combine with lifestyle images
-
Lifestyle images help the customer better understand how the product works in real life. If you can show its features both with text and a real-life image, it is going to significantly increase its comprehensiveness, and thus, your conversion rates.
Of course, it will only work if your lifestyle image is related to the text.

As you can see in this example, for each benefit, we illustrated a lifestyle image. But you can use one bigger as a background image, as you can see in the following infographic:

-
-
The right text size
-
The text should have a perfect size so that it can be perfectly readable. Don’t make it too big so that it takes more space than necessary, but also don’t make it too short so that people have to zoom out to read what your image says

For lifestyle images
-
-
Interaction with the product.
-
It should always be the model interacting with the product. Avoid the product being in one place and the model being in another one unless it is strictly necessary to make your product more understandable.

As you can see in this example, the model not only is interacting with the product but also is looking at it.
Sometimes sellers make the mistake of showing the model looking at the camera. It distracts the customer from the product and puts attention on the model.
But your product should always be the protagonist of your image. SoÂ
Always try to appeal to your customer’s pain points (the negative things that they are looking to solve with your product)
-
-
Add a short description (4 words max)
-
Such as adding lifestyle images to your infographic is legit, and so is adding info to your lifestyle image.
Adding a small phrase can help better transmit the message you want to convey with your lifestyle image.
If you apply all of these tips, you’ll be sure to boost your brand awareness, which means more sales in the long term!
However, if you’re still not convinced, book a marketing consultation with us! It’s free, and we’ll help you skyrocket your sales and give you the best listing for your great product.
-
-
Show the product clearly
-
The more visual information you give, the better.
Buyers tend to choose those listings that show them the information that they are looking for at first sight.
You see when a customer looks something up on Amazon, they are shown thousands of listings, and of course, they don’t have the time to read all that information to see which one is the best fit for them, that’s why they rely on hero images
That way they can know what you offer is best. Imagine, for example, that you want to buy a phone. You are given two listings with the same title, price, and reviews and you are supposed to decide which product you are going to buy based on the image. Image A shows only the phone, and image B shows the phone, a charger, and earpods.
So if your product has various compartments, it’s super important that you show more than that
-
-
Consider using hand models or props
-
If your product is something that you can touch or interact with, you should consider using a hand model.
We optimized a hero image for one of our clients’ touch light products, which clearly relies on the touching experience:


As you can see, we included a female hand model to connect with the buyer persona, who by the way were women who wanted to enhance their babies’ sleep.
After uploading the content on April 16, our client increased sales by 85.7% without tweaking PPC or driving external traffic

So always keep in mind your customer persona and use props when they are going to help you enhance the comprehension of your product.
For infographics
-
-
No more than 4 features.
-
Infographics are supposed to give the client reassurance that the product is going to work, so an infographic shouldn’t have more than 4 features, but it has to be complete enough to make the client certain about the usefulness of the product
So be clear and concise, and select only the information that is really important to your customer.Â

-
-
Combine with lifestyle images
-
Lifestyle images help the customer better understand how the product works in real life. If you can show its features both with text and a real-life image, it is going to significantly increase its comprehensiveness, and thus, your conversion rates.
Of course, it will only work if your lifestyle image is related to the text.

As you can see in this example, for each benefit, we illustrated a lifestyle image. But you can use one bigger as a background image, as you can see in the following infographic:

-
-
The right text size
-
The text should have a perfect size so that it can be perfectly readable. Don’t make it too big so that it takes more space than necessary, but also don’t make it too short so that people have to zoom out to read what your image says

For lifestyle images
-
-
Interaction with the product.
-
It should always be the model interacting with the product. Avoid the product being in one place and the model being in another one unless it is strictly necessary to make your product more understandable.

As you can see in this example, the model not only is interacting with the product but also is looking at it.
Sometimes sellers make the mistake of showing the model looking at the camera. It distracts the customer from the product and puts attention on the model.
But your product should always be the protagonist of your image. SoÂ
Always try to appeal to your customer’s pain points (the negative things that they are looking to solve with your product)
-
-
Add a short description (4 words max)
-
Such as adding lifestyle images to your infographic is legit, and so is adding info to your lifestyle image.
Adding a small phrase can help better transmit the message you want to convey with your lifestyle image.
If you apply all of these tips, you’ll be sure to boost your brand awareness, which means more sales in the long term!
However, if you’re still not convinced, book a marketing consultation with us! It’s free, and we’ll help you skyrocket your sales and give you the best listing for your great product.
-
- Show a human model that is sitting, kneeling, leaning, or lying down (models must be standing).
-
- Hero images of clothing accessories must not show any part of a mannequin, regardless of the mannequin’s appearance (clear, solid-color, flesh-toned, framework, or hanger).
-
- Show Kids & Baby clothing on a human model. They must be shown lying flat on a surface or using an invisible mannequin as long as the entire product remains visible.
-
- Include multiple views of a single product.
-
- Include text, logos, borders, color blocks, watermarks, or other graphics over the top of a product or in the background.
| Tip: If you want to remark your brand logo or additional attributes, take advantage of infographics to describe more in detail everything you want to communicate about your product. Also, if your product naturally includes the brand logo, make sure that it is clearly visible when taking the Hero images pictures. That way you’ll improve the power of your brand. |
Amazon product image best practices
For hero images
-
-
Show the product clearly
-
The more visual information you give, the better.
Buyers tend to choose those listings that show them the information that they are looking for at first sight.
You see when a customer looks something up on Amazon, they are shown thousands of listings, and of course, they don’t have the time to read all that information to see which one is the best fit for them, that’s why they rely on hero images
That way they can know what you offer is best. Imagine, for example, that you want to buy a phone. You are given two listings with the same title, price, and reviews and you are supposed to decide which product you are going to buy based on the image. Image A shows only the phone, and image B shows the phone, a charger, and earpods.
So if your product has various compartments, it’s super important that you show more than that
-
-
Consider using hand models or props
-
If your product is something that you can touch or interact with, you should consider using a hand model.
We optimized a hero image for one of our clients’ touch light products, which clearly relies on the touching experience:


As you can see, we included a female hand model to connect with the buyer persona, who by the way were women who wanted to enhance their babies’ sleep.
After uploading the content on April 16, our client increased sales by 85.7% without tweaking PPC or driving external traffic

So always keep in mind your customer persona and use props when they are going to help you enhance the comprehension of your product.
For infographics
-
-
No more than 4 features.
-
Infographics are supposed to give the client reassurance that the product is going to work, so an infographic shouldn’t have more than 4 features, but it has to be complete enough to make the client certain about the usefulness of the product
So be clear and concise, and select only the information that is really important to your customer.Â

-
-
Combine with lifestyle images
-
Lifestyle images help the customer better understand how the product works in real life. If you can show its features both with text and a real-life image, it is going to significantly increase its comprehensiveness, and thus, your conversion rates.
Of course, it will only work if your lifestyle image is related to the text.

As you can see in this example, for each benefit, we illustrated a lifestyle image. But you can use one bigger as a background image, as you can see in the following infographic:

-
-
The right text size
-
The text should have a perfect size so that it can be perfectly readable. Don’t make it too big so that it takes more space than necessary, but also don’t make it too short so that people have to zoom out to read what your image says

For lifestyle images
-
-
Interaction with the product.
-
It should always be the model interacting with the product. Avoid the product being in one place and the model being in another one unless it is strictly necessary to make your product more understandable.

As you can see in this example, the model not only is interacting with the product but also is looking at it.
Sometimes sellers make the mistake of showing the model looking at the camera. It distracts the customer from the product and puts attention on the model.
But your product should always be the protagonist of your image. SoÂ
Always try to appeal to your customer’s pain points (the negative things that they are looking to solve with your product)
-
-
Add a short description (4 words max)
-
Such as adding lifestyle images to your infographic is legit, and so is adding info to your lifestyle image.
Adding a small phrase can help better transmit the message you want to convey with your lifestyle image.
If you apply all of these tips, you’ll be sure to boost your brand awareness, which means more sales in the long term!
However, if you’re still not convinced, book a marketing consultation with us! It’s free, and we’ll help you skyrocket your sales and give you the best listing for your great product.
-
- Must have a pure white background (pure white blends in with the Amazon search and product detail pages (RGB color values of 255, 255, 255).
-
- Must show the entire product that is for sale. Images must not touch or be cut off by the edge of the image frame, except for Jewellery (e.g. necklaces).
-
- Must show products outside their packaging. Boxes, bags, or cases should not appear in the image unless they are an important product feature.
-
- Must show a single shoe, facing left at a 45-degree angle.
-
- Must show the product on a human model or lying flat on a surface. Invisible mannequins are acceptable as long as the product is not obscured.
-
- Must be professional photographs of the actual product (graphics, illustrations, mock-ups, or placeholders are not allowed). They must not show excluded accessories or props that might confuse the customer.
Your Hero images must not:
-
- Show a human model that is sitting, kneeling, leaning, or lying down (models must be standing).
-
- Hero images of clothing accessories must not show any part of a mannequin, regardless of the mannequin’s appearance (clear, solid-color, flesh-toned, framework, or hanger).
-
- Show Kids & Baby clothing on a human model. They must be shown lying flat on a surface or using an invisible mannequin as long as the entire product remains visible.
-
- Include multiple views of a single product.
-
- Include text, logos, borders, color blocks, watermarks, or other graphics over the top of a product or in the background.
| Tip: If you want to remark your brand logo or additional attributes, take advantage of infographics to describe more in detail everything you want to communicate about your product. Also, if your product naturally includes the brand logo, make sure that it is clearly visible when taking the Hero images pictures. That way you’ll improve the power of your brand. |
Amazon product image best practices
For hero images
-
-
Show the product clearly
-
The more visual information you give, the better.
Buyers tend to choose those listings that show them the information that they are looking for at first sight.
You see when a customer looks something up on Amazon, they are shown thousands of listings, and of course, they don’t have the time to read all that information to see which one is the best fit for them, that’s why they rely on hero images
That way they can know what you offer is best. Imagine, for example, that you want to buy a phone. You are given two listings with the same title, price, and reviews and you are supposed to decide which product you are going to buy based on the image. Image A shows only the phone, and image B shows the phone, a charger, and earpods.
So if your product has various compartments, it’s super important that you show more than that
-
-
Consider using hand models or props
-
If your product is something that you can touch or interact with, you should consider using a hand model.
We optimized a hero image for one of our clients’ touch light products, which clearly relies on the touching experience:


As you can see, we included a female hand model to connect with the buyer persona, who by the way were women who wanted to enhance their babies’ sleep.
After uploading the content on April 16, our client increased sales by 85.7% without tweaking PPC or driving external traffic

So always keep in mind your customer persona and use props when they are going to help you enhance the comprehension of your product.
For infographics
-
-
No more than 4 features.
-
Infographics are supposed to give the client reassurance that the product is going to work, so an infographic shouldn’t have more than 4 features, but it has to be complete enough to make the client certain about the usefulness of the product
So be clear and concise, and select only the information that is really important to your customer.Â

-
-
Combine with lifestyle images
-
Lifestyle images help the customer better understand how the product works in real life. If you can show its features both with text and a real-life image, it is going to significantly increase its comprehensiveness, and thus, your conversion rates.
Of course, it will only work if your lifestyle image is related to the text.

As you can see in this example, for each benefit, we illustrated a lifestyle image. But you can use one bigger as a background image, as you can see in the following infographic:

-
-
The right text size
-
The text should have a perfect size so that it can be perfectly readable. Don’t make it too big so that it takes more space than necessary, but also don’t make it too short so that people have to zoom out to read what your image says

For lifestyle images
-
-
Interaction with the product.
-
It should always be the model interacting with the product. Avoid the product being in one place and the model being in another one unless it is strictly necessary to make your product more understandable.

As you can see in this example, the model not only is interacting with the product but also is looking at it.
Sometimes sellers make the mistake of showing the model looking at the camera. It distracts the customer from the product and puts attention on the model.
But your product should always be the protagonist of your image. SoÂ
Always try to appeal to your customer’s pain points (the negative things that they are looking to solve with your product)
-
-
Add a short description (4 words max)
-
Such as adding lifestyle images to your infographic is legit, and so is adding info to your lifestyle image.
Adding a small phrase can help better transmit the message you want to convey with your lifestyle image.
If you apply all of these tips, you’ll be sure to boost your brand awareness, which means more sales in the long term!
However, if you’re still not convinced, book a marketing consultation with us! It’s free, and we’ll help you skyrocket your sales and give you the best listing for your great product.
-
- Exceed 10,000px on the longest side.
-
- Be blurry, pixelated, or have jagged edges.
-
- Contain nudity or be sexually suggestive. Kids, baby leotards, underwear, and swimwear must not be shown on a human model.
-
- Include any Amazon logos or trademarks, variations, modifications, or anything confusingly similar to Amazon’s logos and trademarks. This includes but is not limited to, any words or logos with the terms AMAZON, PRIME, ALEXA, or the Amazon Smile design.
-
- Include any badges used on Amazon, variations, modifications, or anything confusingly similar to such badges. This includes but is not limited to, “Amazon’s Choice”, “Premium Choice”, “Amazon Alexa”, “Works with Amazon Alexa”, “Best Seller” or “˜Top Seller”. Refer to trademark usage guidelines for more details.
Site standards for Hero Images:
-
- Must have a pure white background (pure white blends in with the Amazon search and product detail pages (RGB color values of 255, 255, 255).
-
- Must show the entire product that is for sale. Images must not touch or be cut off by the edge of the image frame, except for Jewellery (e.g. necklaces).
-
- Must show products outside their packaging. Boxes, bags, or cases should not appear in the image unless they are an important product feature.
-
- Must show a single shoe, facing left at a 45-degree angle.
-
- Must show the product on a human model or lying flat on a surface. Invisible mannequins are acceptable as long as the product is not obscured.
-
- Must be professional photographs of the actual product (graphics, illustrations, mock-ups, or placeholders are not allowed). They must not show excluded accessories or props that might confuse the customer.
Your Hero images must not:
-
- Show a human model that is sitting, kneeling, leaning, or lying down (models must be standing).
-
- Hero images of clothing accessories must not show any part of a mannequin, regardless of the mannequin’s appearance (clear, solid-color, flesh-toned, framework, or hanger).
-
- Show Kids & Baby clothing on a human model. They must be shown lying flat on a surface or using an invisible mannequin as long as the entire product remains visible.
-
- Include multiple views of a single product.
-
- Include text, logos, borders, color blocks, watermarks, or other graphics over the top of a product or in the background.
| Tip: If you want to remark your brand logo or additional attributes, take advantage of infographics to describe more in detail everything you want to communicate about your product. Also, if your product naturally includes the brand logo, make sure that it is clearly visible when taking the Hero images pictures. That way you’ll improve the power of your brand. |
Amazon product image best practices
For hero images
-
-
Show the product clearly
-
The more visual information you give, the better.
Buyers tend to choose those listings that show them the information that they are looking for at first sight.
You see when a customer looks something up on Amazon, they are shown thousands of listings, and of course, they don’t have the time to read all that information to see which one is the best fit for them, that’s why they rely on hero images
That way they can know what you offer is best. Imagine, for example, that you want to buy a phone. You are given two listings with the same title, price, and reviews and you are supposed to decide which product you are going to buy based on the image. Image A shows only the phone, and image B shows the phone, a charger, and earpods.
So if your product has various compartments, it’s super important that you show more than that
-
-
Consider using hand models or props
-
If your product is something that you can touch or interact with, you should consider using a hand model.
We optimized a hero image for one of our clients’ touch light products, which clearly relies on the touching experience:


As you can see, we included a female hand model to connect with the buyer persona, who by the way were women who wanted to enhance their babies’ sleep.
After uploading the content on April 16, our client increased sales by 85.7% without tweaking PPC or driving external traffic

So always keep in mind your customer persona and use props when they are going to help you enhance the comprehension of your product.
For infographics
-
-
No more than 4 features.
-
Infographics are supposed to give the client reassurance that the product is going to work, so an infographic shouldn’t have more than 4 features, but it has to be complete enough to make the client certain about the usefulness of the product
So be clear and concise, and select only the information that is really important to your customer.Â

-
-
Combine with lifestyle images
-
Lifestyle images help the customer better understand how the product works in real life. If you can show its features both with text and a real-life image, it is going to significantly increase its comprehensiveness, and thus, your conversion rates.
Of course, it will only work if your lifestyle image is related to the text.

As you can see in this example, for each benefit, we illustrated a lifestyle image. But you can use one bigger as a background image, as you can see in the following infographic:

-
-
The right text size
-
The text should have a perfect size so that it can be perfectly readable. Don’t make it too big so that it takes more space than necessary, but also don’t make it too short so that people have to zoom out to read what your image says

For lifestyle images
-
-
Interaction with the product.
-
It should always be the model interacting with the product. Avoid the product being in one place and the model being in another one unless it is strictly necessary to make your product more understandable.

As you can see in this example, the model not only is interacting with the product but also is looking at it.
Sometimes sellers make the mistake of showing the model looking at the camera. It distracts the customer from the product and puts attention on the model.
But your product should always be the protagonist of your image. SoÂ
Always try to appeal to your customer’s pain points (the negative things that they are looking to solve with your product)
-
-
Add a short description (4 words max)
-
Such as adding lifestyle images to your infographic is legit, and so is adding info to your lifestyle image.
Adding a small phrase can help better transmit the message you want to convey with your lifestyle image.
If you apply all of these tips, you’ll be sure to boost your brand awareness, which means more sales in the long term!
However, if you’re still not convinced, book a marketing consultation with us! It’s free, and we’ll help you skyrocket your sales and give you the best listing for your great product.
-
- The optimal zoom experience for detail pages requires files to be 1600px or larger on the longest side. Zoom has been shown to help enhance sales. If you are unable to meet this requirement, the smallest your file can be for zoom is 1000px, and the smallest your file can be for the site is 500px.
-
- Images must be JPEG (.jpg or .jpeg), TIFF (.tif), PNG(.png), or GIF (.gif) file formats. PNG is preferred. Our servers do not support animated gifs.
Must not:
-
- Exceed 10,000px on the longest side.
-
- Be blurry, pixelated, or have jagged edges.
-
- Contain nudity or be sexually suggestive. Kids, baby leotards, underwear, and swimwear must not be shown on a human model.
-
- Include any Amazon logos or trademarks, variations, modifications, or anything confusingly similar to Amazon’s logos and trademarks. This includes but is not limited to, any words or logos with the terms AMAZON, PRIME, ALEXA, or the Amazon Smile design.
-
- Include any badges used on Amazon, variations, modifications, or anything confusingly similar to such badges. This includes but is not limited to, “Amazon’s Choice”, “Premium Choice”, “Amazon Alexa”, “Works with Amazon Alexa”, “Best Seller” or “˜Top Seller”. Refer to trademark usage guidelines for more details.
Site standards for Hero Images:
-
- Must have a pure white background (pure white blends in with the Amazon search and product detail pages (RGB color values of 255, 255, 255).
-
- Must show the entire product that is for sale. Images must not touch or be cut off by the edge of the image frame, except for Jewellery (e.g. necklaces).
-
- Must show products outside their packaging. Boxes, bags, or cases should not appear in the image unless they are an important product feature.
-
- Must show a single shoe, facing left at a 45-degree angle.
-
- Must show the product on a human model or lying flat on a surface. Invisible mannequins are acceptable as long as the product is not obscured.
-
- Must be professional photographs of the actual product (graphics, illustrations, mock-ups, or placeholders are not allowed). They must not show excluded accessories or props that might confuse the customer.
Your Hero images must not:
-
- Show a human model that is sitting, kneeling, leaning, or lying down (models must be standing).
-
- Hero images of clothing accessories must not show any part of a mannequin, regardless of the mannequin’s appearance (clear, solid-color, flesh-toned, framework, or hanger).
-
- Show Kids & Baby clothing on a human model. They must be shown lying flat on a surface or using an invisible mannequin as long as the entire product remains visible.
-
- Include multiple views of a single product.
-
- Include text, logos, borders, color blocks, watermarks, or other graphics over the top of a product or in the background.
| Tip: If you want to remark your brand logo or additional attributes, take advantage of infographics to describe more in detail everything you want to communicate about your product. Also, if your product naturally includes the brand logo, make sure that it is clearly visible when taking the Hero images pictures. That way you’ll improve the power of your brand. |
Amazon product image best practices
For hero images
-
-
Show the product clearly
-
The more visual information you give, the better.
Buyers tend to choose those listings that show them the information that they are looking for at first sight.
You see when a customer looks something up on Amazon, they are shown thousands of listings, and of course, they don’t have the time to read all that information to see which one is the best fit for them, that’s why they rely on hero images
That way they can know what you offer is best. Imagine, for example, that you want to buy a phone. You are given two listings with the same title, price, and reviews and you are supposed to decide which product you are going to buy based on the image. Image A shows only the phone, and image B shows the phone, a charger, and earpods.
So if your product has various compartments, it’s super important that you show more than that
-
-
Consider using hand models or props
-
If your product is something that you can touch or interact with, you should consider using a hand model.
We optimized a hero image for one of our clients’ touch light products, which clearly relies on the touching experience:


As you can see, we included a female hand model to connect with the buyer persona, who by the way were women who wanted to enhance their babies’ sleep.
After uploading the content on April 16, our client increased sales by 85.7% without tweaking PPC or driving external traffic

So always keep in mind your customer persona and use props when they are going to help you enhance the comprehension of your product.
For infographics
-
-
No more than 4 features.
-
Infographics are supposed to give the client reassurance that the product is going to work, so an infographic shouldn’t have more than 4 features, but it has to be complete enough to make the client certain about the usefulness of the product
So be clear and concise, and select only the information that is really important to your customer.Â

-
-
Combine with lifestyle images
-
Lifestyle images help the customer better understand how the product works in real life. If you can show its features both with text and a real-life image, it is going to significantly increase its comprehensiveness, and thus, your conversion rates.
Of course, it will only work if your lifestyle image is related to the text.

As you can see in this example, for each benefit, we illustrated a lifestyle image. But you can use one bigger as a background image, as you can see in the following infographic:

-
-
The right text size
-
The text should have a perfect size so that it can be perfectly readable. Don’t make it too big so that it takes more space than necessary, but also don’t make it too short so that people have to zoom out to read what your image says

For lifestyle images
-
-
Interaction with the product.
-
It should always be the model interacting with the product. Avoid the product being in one place and the model being in another one unless it is strictly necessary to make your product more understandable.

As you can see in this example, the model not only is interacting with the product but also is looking at it.
Sometimes sellers make the mistake of showing the model looking at the camera. It distracts the customer from the product and puts attention on the model.
But your product should always be the protagonist of your image. SoÂ
Always try to appeal to your customer’s pain points (the negative things that they are looking to solve with your product)
-
-
Add a short description (4 words max)
-
Such as adding lifestyle images to your infographic is legit, and so is adding info to your lifestyle image.
Adding a small phrase can help better transmit the message you want to convey with your lifestyle image.
If you apply all of these tips, you’ll be sure to boost your brand awareness, which means more sales in the long term!
However, if you’re still not convinced, book a marketing consultation with us! It’s free, and we’ll help you skyrocket your sales and give you the best listing for your great product.
-
- Images must accurately represent the product that is for sale.
-
- Images must match the product title.
-
- The product must fill at least 85% of the image.
Example:
-
- The optimal zoom experience for detail pages requires files to be 1600px or larger on the longest side. Zoom has been shown to help enhance sales. If you are unable to meet this requirement, the smallest your file can be for zoom is 1000px, and the smallest your file can be for the site is 500px.
-
- Images must be JPEG (.jpg or .jpeg), TIFF (.tif), PNG(.png), or GIF (.gif) file formats. PNG is preferred. Our servers do not support animated gifs.
Must not:
-
- Exceed 10,000px on the longest side.
-
- Be blurry, pixelated, or have jagged edges.
-
- Contain nudity or be sexually suggestive. Kids, baby leotards, underwear, and swimwear must not be shown on a human model.
-
- Include any Amazon logos or trademarks, variations, modifications, or anything confusingly similar to Amazon’s logos and trademarks. This includes but is not limited to, any words or logos with the terms AMAZON, PRIME, ALEXA, or the Amazon Smile design.
-
- Include any badges used on Amazon, variations, modifications, or anything confusingly similar to such badges. This includes but is not limited to, “Amazon’s Choice”, “Premium Choice”, “Amazon Alexa”, “Works with Amazon Alexa”, “Best Seller” or “˜Top Seller”. Refer to trademark usage guidelines for more details.
Site standards for Hero Images:
-
- Must have a pure white background (pure white blends in with the Amazon search and product detail pages (RGB color values of 255, 255, 255).
-
- Must show the entire product that is for sale. Images must not touch or be cut off by the edge of the image frame, except for Jewellery (e.g. necklaces).
-
- Must show products outside their packaging. Boxes, bags, or cases should not appear in the image unless they are an important product feature.
-
- Must show a single shoe, facing left at a 45-degree angle.
-
- Must show the product on a human model or lying flat on a surface. Invisible mannequins are acceptable as long as the product is not obscured.
-
- Must be professional photographs of the actual product (graphics, illustrations, mock-ups, or placeholders are not allowed). They must not show excluded accessories or props that might confuse the customer.
Your Hero images must not:
-
- Show a human model that is sitting, kneeling, leaning, or lying down (models must be standing).
-
- Hero images of clothing accessories must not show any part of a mannequin, regardless of the mannequin’s appearance (clear, solid-color, flesh-toned, framework, or hanger).
-
- Show Kids & Baby clothing on a human model. They must be shown lying flat on a surface or using an invisible mannequin as long as the entire product remains visible.
-
- Include multiple views of a single product.
-
- Include text, logos, borders, color blocks, watermarks, or other graphics over the top of a product or in the background.
| Tip: If you want to remark your brand logo or additional attributes, take advantage of infographics to describe more in detail everything you want to communicate about your product. Also, if your product naturally includes the brand logo, make sure that it is clearly visible when taking the Hero images pictures. That way you’ll improve the power of your brand. |
Amazon product image best practices
For hero images
-
-
Show the product clearly
-
The more visual information you give, the better.
Buyers tend to choose those listings that show them the information that they are looking for at first sight.
You see when a customer looks something up on Amazon, they are shown thousands of listings, and of course, they don’t have the time to read all that information to see which one is the best fit for them, that’s why they rely on hero images
That way they can know what you offer is best. Imagine, for example, that you want to buy a phone. You are given two listings with the same title, price, and reviews and you are supposed to decide which product you are going to buy based on the image. Image A shows only the phone, and image B shows the phone, a charger, and earpods.
So if your product has various compartments, it’s super important that you show more than that
-
-
Consider using hand models or props
-
If your product is something that you can touch or interact with, you should consider using a hand model.
We optimized a hero image for one of our clients’ touch light products, which clearly relies on the touching experience:


As you can see, we included a female hand model to connect with the buyer persona, who by the way were women who wanted to enhance their babies’ sleep.
After uploading the content on April 16, our client increased sales by 85.7% without tweaking PPC or driving external traffic

So always keep in mind your customer persona and use props when they are going to help you enhance the comprehension of your product.
For infographics
-
-
No more than 4 features.
-
Infographics are supposed to give the client reassurance that the product is going to work, so an infographic shouldn’t have more than 4 features, but it has to be complete enough to make the client certain about the usefulness of the product
So be clear and concise, and select only the information that is really important to your customer.Â

-
-
Combine with lifestyle images
-
Lifestyle images help the customer better understand how the product works in real life. If you can show its features both with text and a real-life image, it is going to significantly increase its comprehensiveness, and thus, your conversion rates.
Of course, it will only work if your lifestyle image is related to the text.

As you can see in this example, for each benefit, we illustrated a lifestyle image. But you can use one bigger as a background image, as you can see in the following infographic:

-
-
The right text size
-
The text should have a perfect size so that it can be perfectly readable. Don’t make it too big so that it takes more space than necessary, but also don’t make it too short so that people have to zoom out to read what your image says

For lifestyle images
-
-
Interaction with the product.
-
It should always be the model interacting with the product. Avoid the product being in one place and the model being in another one unless it is strictly necessary to make your product more understandable.

As you can see in this example, the model not only is interacting with the product but also is looking at it.
Sometimes sellers make the mistake of showing the model looking at the camera. It distracts the customer from the product and puts attention on the model.
But your product should always be the protagonist of your image. SoÂ
Always try to appeal to your customer’s pain points (the negative things that they are looking to solve with your product)
-
-
Add a short description (4 words max)
-
Such as adding lifestyle images to your infographic is legit, and so is adding info to your lifestyle image.
Adding a small phrase can help better transmit the message you want to convey with your lifestyle image.
If you apply all of these tips, you’ll be sure to boost your brand awareness, which means more sales in the long term!
However, if you’re still not convinced, book a marketing consultation with us! It’s free, and we’ll help you skyrocket your sales and give you the best listing for your great product.


